Zoom Faculty Guide
Zoom Faculty Guide
Zoom at Barnard
Zoom is the videoconferencing platform Barnard College uses to support teaching and learning. It is integrated with CourseWorks (Canvas) and Panopto to provide a seamless experience for students and faculty.
All Barnard users access Zoom with their Columbia UNI credentials. To access your account, log in at https://columbiauniversity.zoom.us/signin or follow these instructions to log in through the Zoom desktop or mobile apps.
Below, we've provided guidance for using Zoom at Barnard. If you need additional Zoom help, please reach out to us at atlis@barnard.edu and we'll be happy to assist you.
Zoom Pro Accounts
Faculty, graduate student TAs, and staff are eligible for Zoom Pro accounts. Zoom Pro accounts are not available to undergraduate students, including undergraduate TAs. If you do not have a Zoom Pro account and are eligible for an upgrade, see "Requesting a Pro Account Upgrade" below. The Zoom Pro account will be linked to your Columbia UNI.
Checking Your Zoom Account Level
To confirm whether you have a Basic or Licensed (Pro) account:
- Navigate to columbiauniversity.zoom.us and log in with your UNI and password
- Click on the person icon in the upper right corner
- Check whether it says "Basic" or "Licensed" next to your name and email address
For detailed sign-in instructions, including mobile and desktop app setup, see CUIT's Zoom sign-in documentation.
If you have a Pro account but are experiencing issues accessing Zoom in CourseWorks, see the FAQ & Troubleshooting section for steps you can take to resolve the issue.
Steps to Request an Upgrade
If you’re eligible for a Zoom Pro account, please complete the following steps to request an upgrade:
- Activate your Columbia UNI - This is required for all Barnard affiliates
- Set up UNI mail forwarding (strongly recommended) - Forward your @columbia.edu email to your @barnard.edu address to ensure you receive notification emails sent from Zoom
- Activate your Zoom Basic account - Log in at https://columbiauniversity.zoom.us to create your basic account. For additional information about signing in, see CUIT's Zoom sign-in documentation.
- Email us at atlis@barnard.edu to request your upgrade, confirming that you’ve completed the steps above.
After Contacting Us
-
We'll submit your upgrade request to CUIT
- You'll receive an automated activation email within a few hours
- Follow the instructions in that email to complete your upgrade
- You can confirm the upgrade worked by checking that your account shows "Licensed" instead of "Basic"
Final Step
After your account is upgraded, you'll need to add your Columbia email address to CourseWorks and set it as your primary contact method to access the Zoom Class Sessions tab in your courses. You can find instructions for adding your Columbia email address and setting it as your default in CourseWorks on Canvas's website. After updating your default email, we recommend reviewing your notification settings to ensure they are set up as expected.
Scheduling Zoom Meetings
If you plan to conduct a class session via Zoom, please use the Zoom Class Session feature in CourseWorks. Zoom meetings scheduled through the Zoom Class Sessions tab in CourseWorks will be accessible to all students in the class.
We highly recommend that instructors schedule meetings themselves, rather than assigning this task to someone else. This ensures that the instructor will be the host of the meeting and can manage any recordings. TAs or co-instructors can also be added to help manage a session (see Meeting Roles for more information).
Video Tutorial
If you're unable to view the video, please log in to Panopto with your Columbia UNI and password.
Written Instructions
- Log in to CourseWorks (Canvas) with your UNI and password and navigate to your course page.
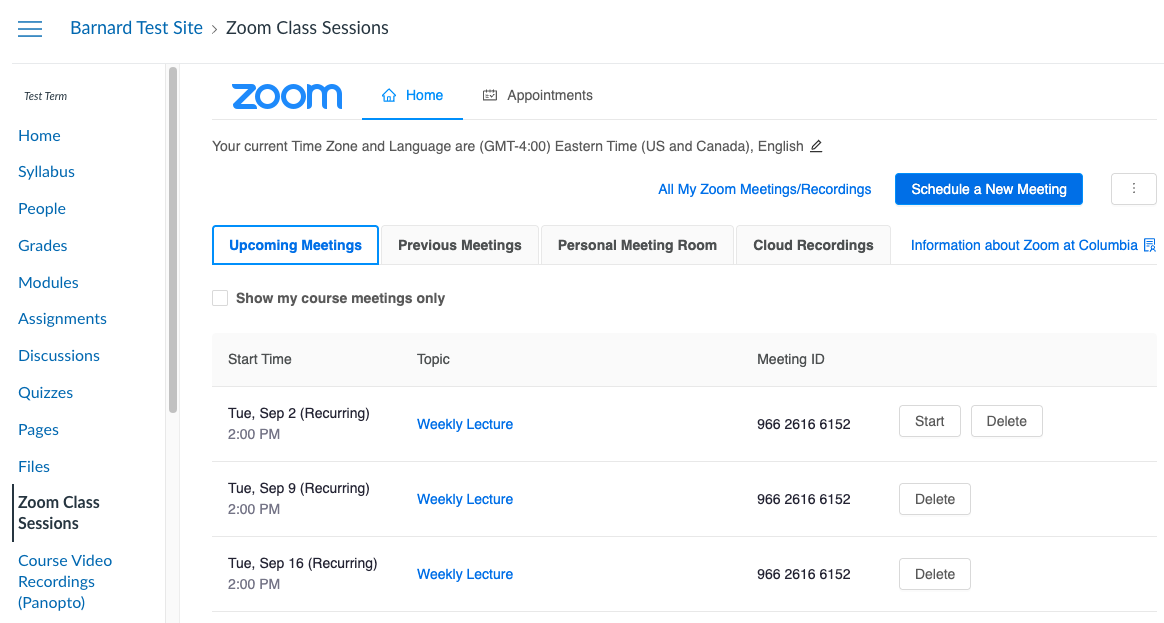
- Click Zoom Class Sessions on the Course Navigation Menu (left column). It will take you to a page that looks like this:
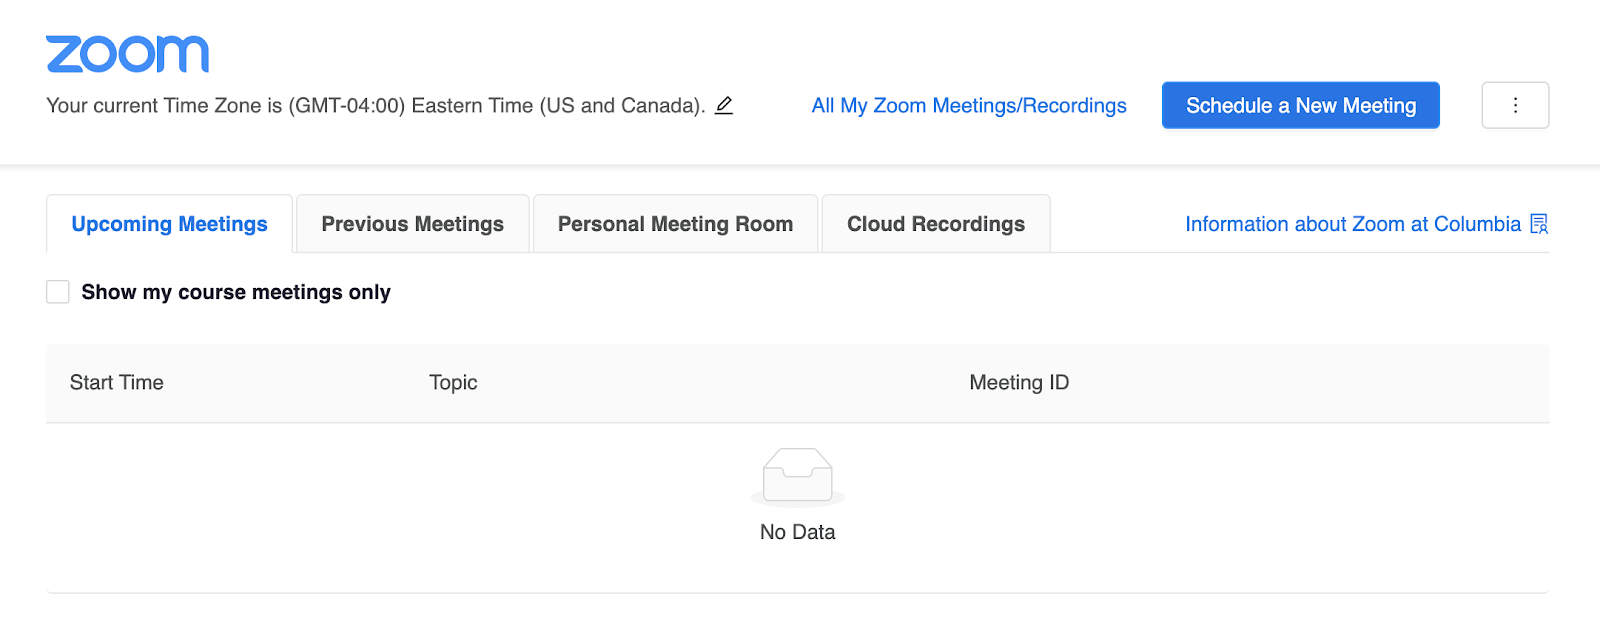
- Click Schedule a New Meeting in the top-right corner of the page.
- Enter the information for the course, including the name, date and time, and duration.

Note: Duration can only be set in fifteen-minute increments. If the duration options don't line up with your class time, it's OK. You can end your session whenever you want. You won't be kicked out of your meeting early or forced to keep it open late.
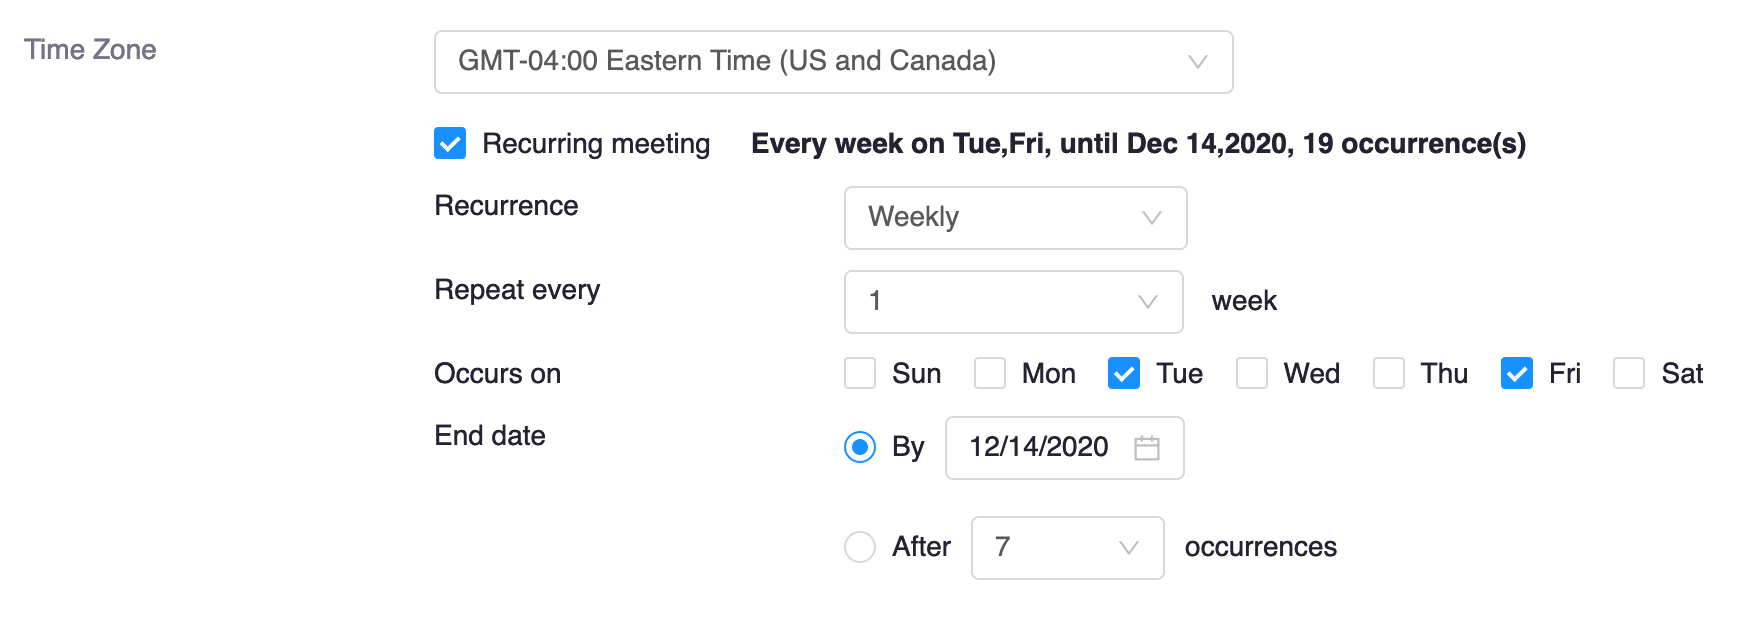
- Click the checkbox for Recurring meeting. You can then choose the recurrence, when class sessions occur, and the end date of the course.
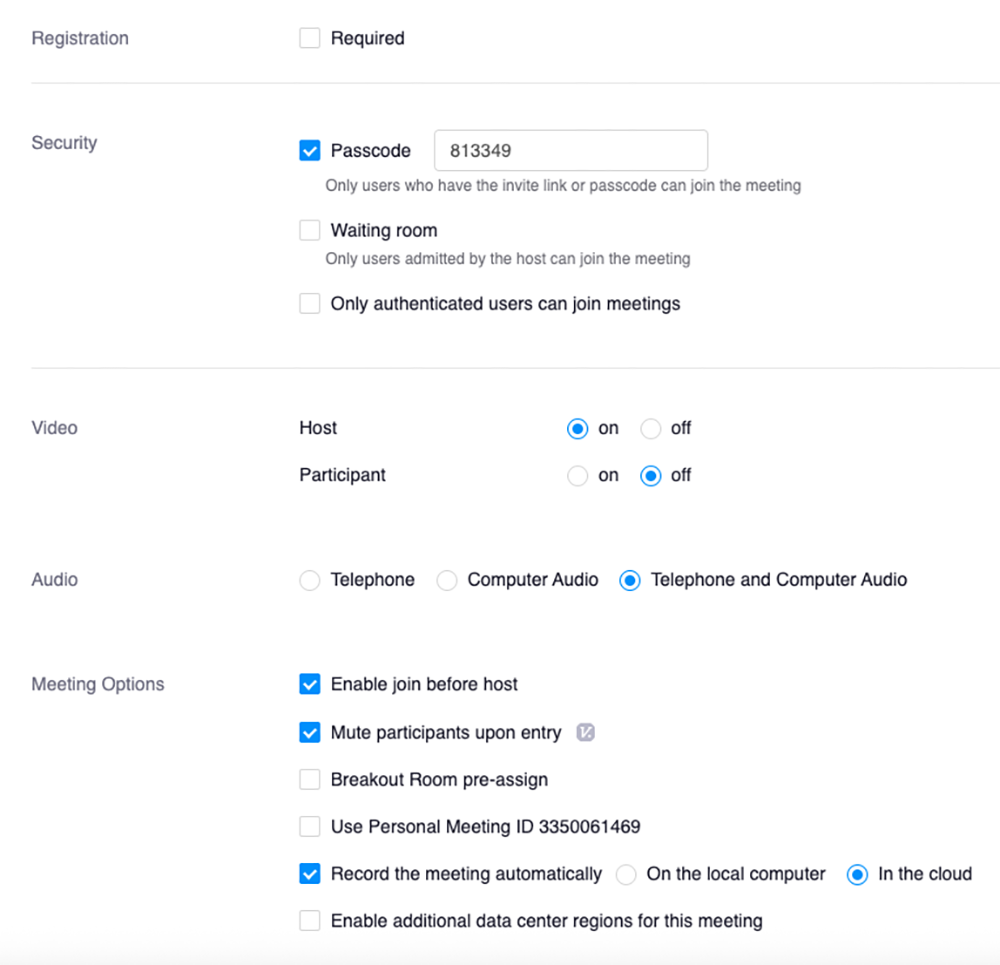
- Choose your meeting options. The recommended settings are pictured below and written out in the following section:
- Click Save. All of your scheduled class sessions will be listed under Upcoming Meetings on the original Zoom Class Sessions page.
- If you need to edit a class session, click the Topic name (in blue). Scroll down and click Edit this Meeting. Remember to click Save to save any edits made.
Please note that Zoom meetings scheduled through the Zoom Class Sessions tab in CourseWorks will be accessible to all students in that class. You can also invite others, such as guest speakers, to these meetings.
Recommended Settings:
- Security: Passcode enabled, Waiting room disabled (if you have a small class or seminar, you may want to consider enabling the waiting room)
- Video: Host on, Participants off
- Audio: Both computer and phone
- Join before host: Personal preference
- Mute participants upon entry: Enabled
- Authentication: Disabled
- Record to cloud: Enabled
- Additional data centers: Disabled (unless guests are in regions like Europe)
More information about these settings can be found in Zoom’s guides on scheduling meetings and inviting others to join a meeting. For additional security considerations, please see Columbia's Zoom Privacy and Security information and Zoom's Best Practices for Securing Your Virtual Classroom.
If you need to hold a meeting that should only be accessible to specific students—such as one-on-one advising, small group check-ins, or make-up sessions—you should schedule it directly in Zoom instead of through CourseWorks (Canvas). This is because meetings scheduled through CourseWorks are visible and accessible to all students in the class.
You can schedule meetings through the Columbia Zoom website or by using the Zoom desktop app (be sure to log in with SSO and the Columbia domain). After scheduling, copy the meeting invitation and share it directly with the intended student(s) by email or another communication method you use with your class.
Recommended Settings:
- Security: Passcode enabled, Waiting room enabled (allows you to admit guests individually)
- Video: Host on, Participants off
- Audio: Both computer and phone
- Mute participants upon entry: Enabled
- Record to cloud: Only if needed for your records
More information about these settings can be found in Zoom’s guides on scheduling meetings and inviting others to join a meeting. For additional security considerations, please see Columbia's Zoom Privacy and Security information and Zoom's Best Practices for Securing Your Virtual Classroom.
You can host office hours on Zoom in a few different ways. For convenience, we recommend setting up a recurring meeting or using your “anytime” Personal Meeting Room link so that both you and your students can rely on the same link every time.
You can schedule office hours through the Columbia Zoom website or by using the Zoom desktop app (be sure to log in with SSO and the Columbia domain). After scheduling, copy the meeting invitation and share it with your students by email or by adding it in your syllabus in CourseWorks for easy access.
If you prefer, you can also set up a recurring Zoom meeting directly in CourseWorks using the Zoom Class Sessions tool.
- Recurring meeting: Create a recurring meeting titled “Office Hours” so students can always use the same link.
- Personal Meeting Room: In CourseWorks, go to Zoom Class Sessions and select the Personal Meeting Room tab. Share the join URL with students so they can access your office hours anytime.
- Individual meetings: For one-on-one sessions, you can also schedule separate meetings directly in Zoom (via the browser or desktop app) and send the unique link to each student.
Recommended Settings:
- Security: Passcode enabled, Waiting room enabled (allows you to admit guests individually)
- Video: Host on, Participants off
- Audio: Both computer and phone
- Join before host: Disabled
- Mute participants upon entry: Enabled
More information about these settings can be found in Zoom’s guides on scheduling meetings and inviting others to join a meeting. For additional security considerations, please see Columbia's Zoom Privacy and Security information and Zoom's Best Practices for Securing Your Virtual Classroom.
Starting Zoom Meetings
We recommend starting your Zoom meetings from the Zoom desktop app. This ensures you are signed into your Zoom Pro account with your UNI and password and receive the correct Host role in your meeting. Logging into CourseWorks (Canvas) to start the meeting from the Zoom Class Sessions tab is not enough—you must also be logged into the same Zoom account in the desktop app before starting the session.
The Zoom desktop app should be downloaded directly from Zoom's website.
Starting from the Zoom Desktop App
- Open the Zoom desktop app and click Sign in with SSO.
- When prompted for a company domain, enter columbiauniversity, then log in with your UNI and password.
- Locate your meeting:
- Home tab — shows today’s meetings. Click the meeting card, then Start.
- Meetings or Calendar tab — find your upcoming meeting and click Start.
Note: If you haven’t connected a calendar, you’ll see a Meetings tab. If you have calendar integration, you’ll see a Calendar tab instead.
For more information, see Zoom’s documentation on starting a meeting.
Starting from CourseWorks (Canvas)
- Important: Be sure you have already signed into the Zoom desktop app with UNI and password before starting a meeting through CourseWorks (Canvas); otherwise you may not have Host permissions.
- Log in to CourseWorks with your UNI and password, and navigate to the page for your course.
- Click Zoom Class Sessions on the Course Navigation Menu (left column). It will take you to a page that looks like this:
- Find the session that corresponds to the current date and time (it should be near the top of the page) and click the Start button.
Managing In-Meeting Controls
Managing your Zoom meetings effectively requires both proper setup and active management during the meeting. When scheduling meetings, make sure that the Zoom session is accessible only to your intended participants by using the meeting settings recommended in the scheduling sections above (Scheduling Class Sessions, Scheduling Individual or Small Group Meetings, and Scheduling Office Hours).
Once your meeting is running, you can use in-meeting settings and controls to manage participants and keep things secure and productive. This can include muting and unmuting participants, controlling the meeting chat, and managing who can share their screen. Below are the key tools that Zoom provides for managing participants and controlling meeting activity.
Access all in-meeting security options through the Security button in your host controls for quick adjustments during your meeting.
Manage participant permissions including who can use chat, unmute themselves, start video, and rename themselves during the meeting.
Control who can share their screen during the meeting. You can restrict screen sharing to only the host or allow all participants to share content.
Teaching in Zoom
Zoom offers features that can support teaching, help manage class discussions, and encourage student engagement. Below, we highlight tools that Barnard instructors find most useful. Click the name of each tool for more information and steps for using it in your course Zoom meetings.
If you’re using a tool for the first time, we recommend testing it before class. That way, you'll have an opportunity to see how it works and can reach out to us at atlis@barnard.edu if you need assistance.
Facilitating Discussion & Participation
Use host controls to mute/unmute, stop video, limit screen sharing, and manage the waiting room.
Share links, collect questions, or take attendance by asking students to post their names.
Students can raise a hand or use reaction icons to signal participation. Let your class know if you’ll be using these tools to moderate discussion.
Gallery view (also known as the "Brady Bunch" view) lets you see many students at once. It can be useful if you want to visually scan the room.
Polls are useful for soliciting student opinions, checking for understanding, and building community (they can make good ice breakers). Polls work best when created before class.
Sharing Content
Share your screen, an app, or a window. You can also allow students to share when appropriate. Mac users may need to adjust display sharing permissions before they can use this feature.
When sharing video clips, enable “Optimize for video” and “Share sound” for best playback quality.
This is useful if you want to share a podcast, music, or other audio-only content.
Zoom provides different ways to share PowerPoint, depending on your computer setup. Select the option that gives you the best control and visibility for your class.
Use Zoom Whiteboard to draw, type, or brainstorm with your students on a shared space during class.
Highlight, draw, and add text to shared content. You can also allow students to annotate together.
Breakout Rooms (Small Group Discussion)
Meeting hosts and co-hosts can create breakout rooms, message breakout rooms, and decide when to close them. They can also move amongst the rooms to check-in with students.
Pre-assigned breakout rooms must be set up in the Zoom web portal. Students need to join while signed into their Barnard/Columbia Zoom accounts to be placed in the correct room.
Meeting Roles
Adding an alternative host allows another Zoom Pro account user, such as a co-instructor, to start and manage a meeting with the same abilities as the host. Alternative hosts must be designated in the meeting’s settings before the meeting begins.
Adding a co-host allows a selected participant, such as a TA, to help with administrative tasks like managing attendees and content. Co-hosts can only be assigned once the meeting has started, and they cannot start meetings on their own.
Recordings & Panopto
We recommend recording class sessions as needed to support students—for example, when students may miss class due to religious observance or illness—or when you want students to review complex material, guest talks, or exam debriefs after the meeting. Recordings are intended to supplement in-person learning, not replace it.
Before You Begin
- Always choose Record to the Cloud — local recordings may be lost and are rarely able to be recovered from classroom computers.
- When the meeting starts, confirm that you are the Meeting Host so you have access to the recording afterward.
How Cloud Recording Storage Works
- Zoom Cloud Storage: all cloud recordings are are saved to the meeting host's "Recordings and Transcripts" section of the Zoom web portal.
- Panopto
- CourseWorks-scheduled meetings: recordings are saved to the course's folder in Panopto.
- Non-CourseWorks meetings: recordings are saved to meeting host's "My Folder > Meeting Recordings" folder in Panopto.
- Processing time: recordings are not available immediately in Panopto; processing typically takes about twice the meeting length.
- You can adjust what is captured using Zoom recording layout settings.
Accessing Recordings
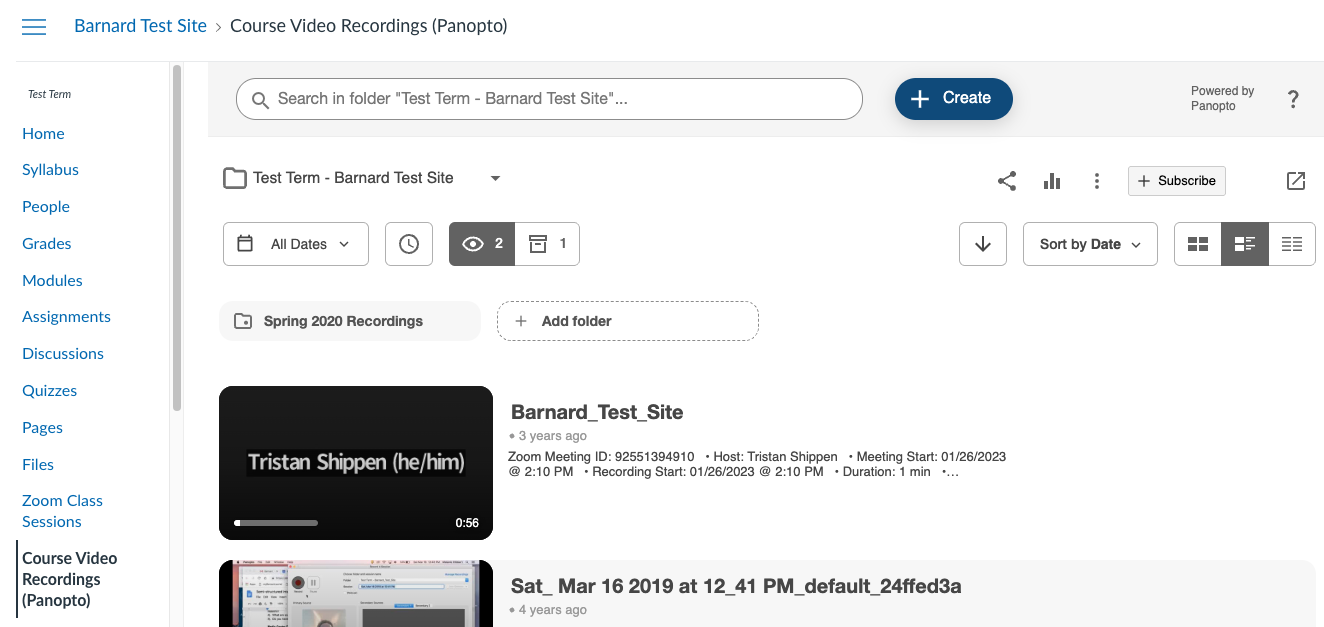
For CourseWorks-scheduled meetings, you and your students can find recordings by navigating to your course in CourseWorks and clicking the Class Video Recordings (Panopto) link. Instructors, TAs, and students in the course can also access the recordings by logging in to Panopto directly and navigating to the course folder.
For additional resources about Panopto, see Columbia's Center for Teaching and Learning's Teaching with Panopto page, or email atlis@barnard.edu for assistance.
Recording Retention Policies
- Zoom cloud storage: recordings remain for 30 days, then are removed.
- Course recordings in Panopto: retained for two years.
- Non-CourseWorks recordings in Panopto: automatically archived after 2 years, then deleted on a monthly basis if they meet all of the following criteria:
- Was created more than 2 years ago
- Has not been viewed in the past year
- Has been archived
Note: Our team (ATLIS) cannot assist with classroom equipment or room-specific Zoom recording setups. For support with classroom AV hardware (such as microphones, cameras, in-room computers, or capture devices), contact AV Services at avhelp@barnard.edu or visit barnard.edu/av.
FAQ & Troubleshooting
Barnard Zoom accounts are provided through Columbia University, so all users access Zoom with their Columbia UNI credentials.
While it is possible to create or sign into Zoom using your Barnard email address (for example, through Google), those accounts are not our official accounts; they cannot be upgraded to a Pro account and do not connect to CourseWorks (Canvas).
You can confirm that you are logged into the correct account by checking your Zoom profile. The email address listed should be YOUR_UNI@columbia.edu.
Note: Our UNIs are managed by Columbia University. If you need assistance logging into your account or run into issues with your UNI, please contact CUIT at askcuit@columbia.edu or visit their Manage My UNI page for more information.
If you have an instructor role (Teacher, NRA Teacher, TA, or Enhanced TA) in a CourseWorks (Canvas) course, but your primary email in CourseWorks is not set to your Columbia email address, the Zoom Class Sessions tab may display the following warning and become unusable.
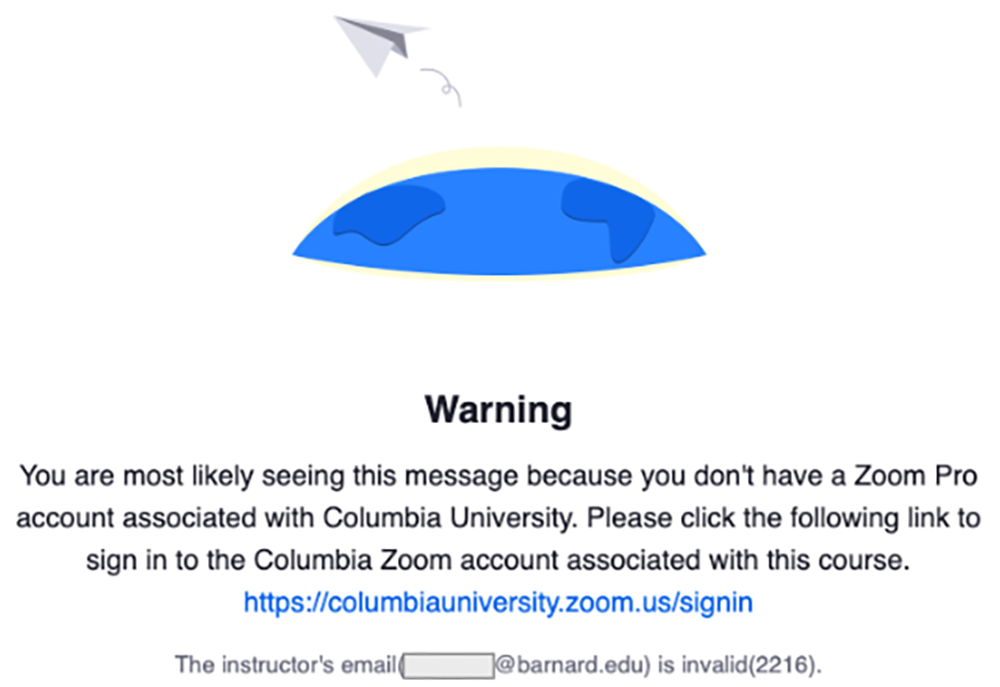
To fix this issue, you'll need to add your Columbia email to CourseWorks and make it your primary contact method. This is because Zoom accounts are provisioned to your @columbia.edu address, and the Zoom integration requires this email match for instructor roles.
You can find instructions for adding your Columbia email address and setting it as your default in CourseWorks on Canvas's website. After you've updated your default email, we recommend reviewing your notification settings to ensure they are set up as expected.
If you continue to have issues after following these steps, please contact us at atlis@barnard.edu for further assistance.
Note: This is course-specific based on your role. If you're a TA in one course but a student in another, you may only see the error in the course where you have the TA role.
If you have a Zoom Pro account but are only able to host meetings for 40 minutes or are unable to access the Zoom Class Sessions tab in your courses, it's possible that your account has been downgraded. Sometimes Zoom Pro accounts are automatically downgraded to Basic as part of routine system maintenance or account reviews.
To restore your Pro account, follow the steps in Requesting a Pro Account Upgrade to confirm that you are accessing the Zoom account associated with your Columbia email address and that the status shows "Basic." Then contact us at atlis@barnard.edu and we'll put in a request to have your account upgraded to back to Pro.
Zoom is available in most countries. For students in China, there are some special instructions for using Zoom:
- Students from China are recommended to download the Chinese-native Zoom client for Zoom sessions at https://zoomcloud.cn/download
- However, students can only join existing sessions. They cannot schedule their own Zoom.
- Please note: the Chinese-native Zoom client does not work in Hong Kong.
However, there are a few countries where students may not be able to access Zoom:
- Cuba
- Iran
- North Korea
- Syria
- Ukraine (Crimea, Donetsk, Kherson, Luhansk, Zaporizhzhia regions)
If you have a student who cannot access Zoom, we can talk through alternative options. Reach out to us at atlis@barnard.edu.
If you can't see host controls (like mute all, manage participants, security settings) during your meeting, the most likely cause is that you're not logged into the same Zoom account that was used to schedule the meeting.
To fix this:
- Leave the current meeting
- Sign into the Zoom desktop app with your Columbia UNI and password (click "Sign in with SSO" and enter "columbiauniversity" as the domain)
- Rejoin the meeting from the desktop app
- You should now have full host controls for your meeting
If you continue to have issues after following these steps, please contact us at atlis@barnard.edu for further assiatnce.
Note: These steps only work if the meeting was scheduled through your Zoom Pro account associated with your Columbia email address. You need to be logged into the same account where the meeting was scheduled in order to get access to the host controls.
There are two recommended options for taking attendance in Zoom:
- You may ask students to type their full name into the chat, then save the in-meeting chat.
- You can generate a meeting report from Zoom. To do this:
- Log into Zoom at https://columbiauniversity.zoom.us/account/my/report (log in with your UNI)
- Find the course session. In the “Participants Source” column, click on the number and you'll be able to see information about all your participants.
- You can also download this meeting info as a CSV file.
Yes, because of the possibility of copyright infringement, not all streaming videos can be screen shared in Zoom. While showing a movie clip in class might be fair use for educational purposes, some media streaming services or video players may block screen sharing protected or copyrighted content.
Here are a few ways you can share video on Zoom:
- YouTube
- Kanopy (certain titles available in CLIO)
- Sharing a DVD through VLC player
Captions are best added to videos using the Panopto platform:
If the video is a Zoom recording, log in to Panopto and navigate to the video. If the video isn't a Zoom recording, upload the video file to Panopto.
- Go to the video settings, and click on captions, in the left-hand navigation.
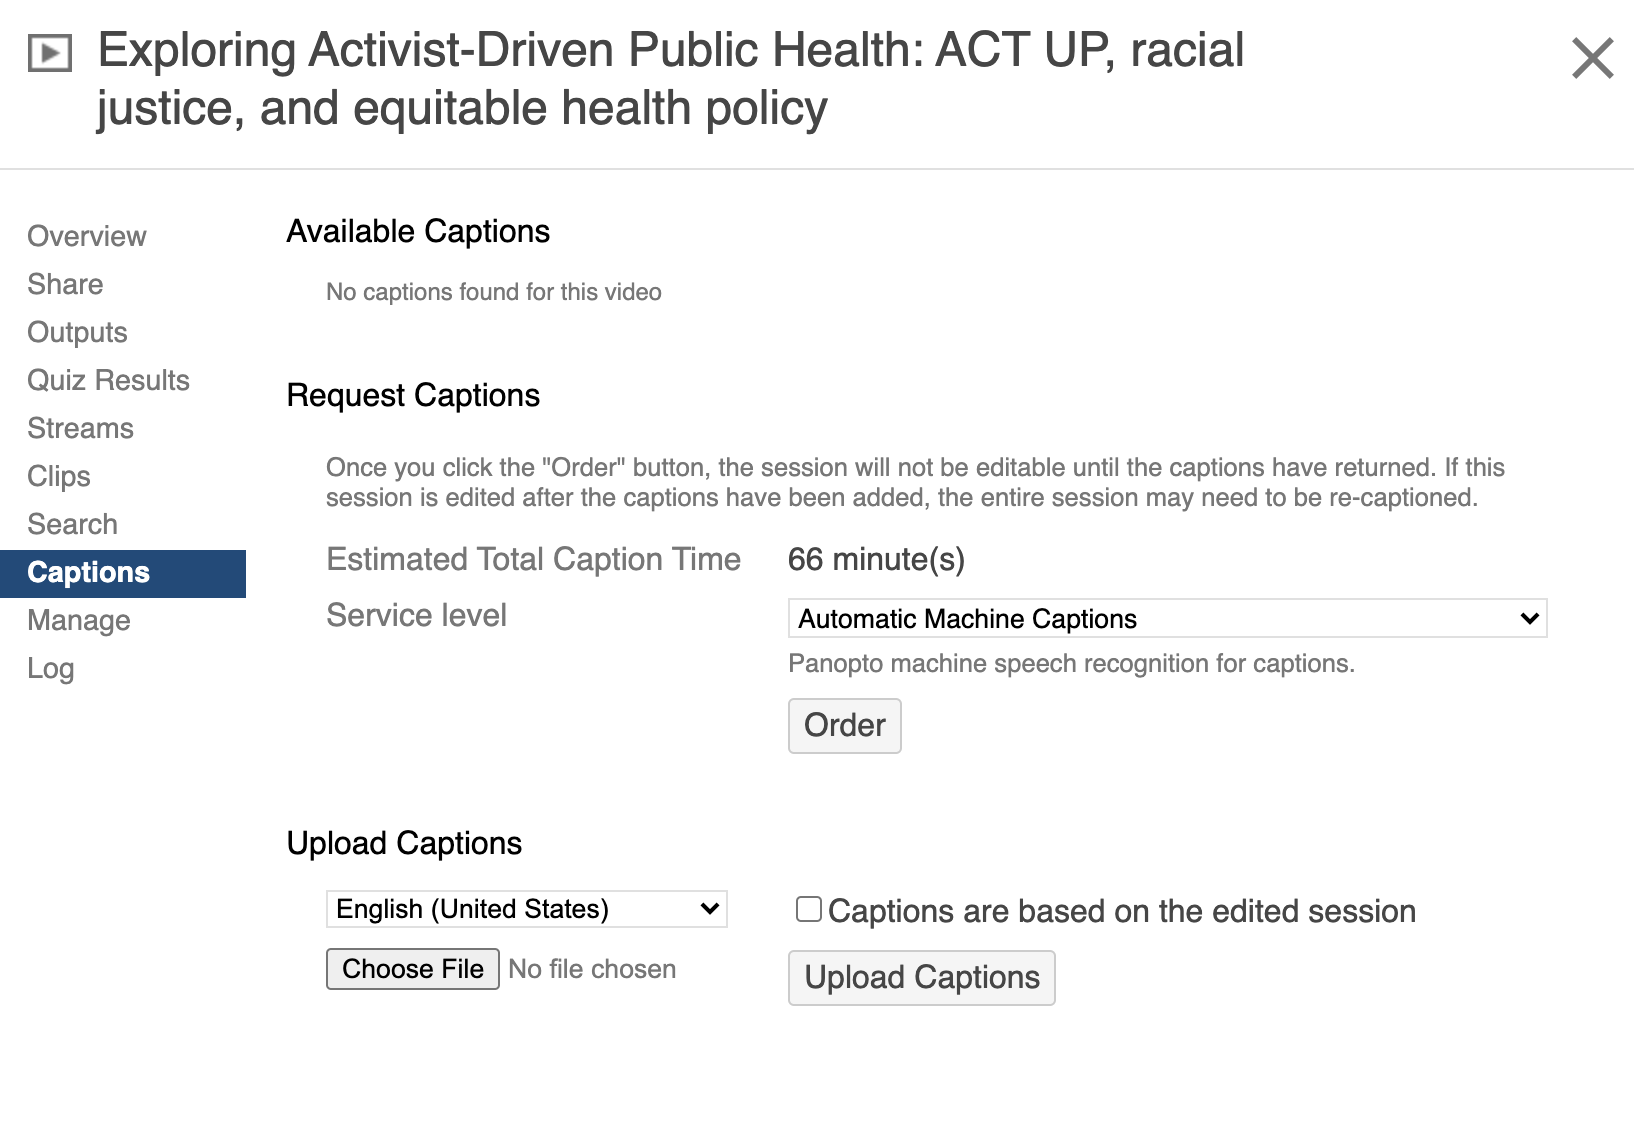
- Click the "order" button - this will start the auto-captioning process. You can then close the settings window (ignore the field about uploading captions).
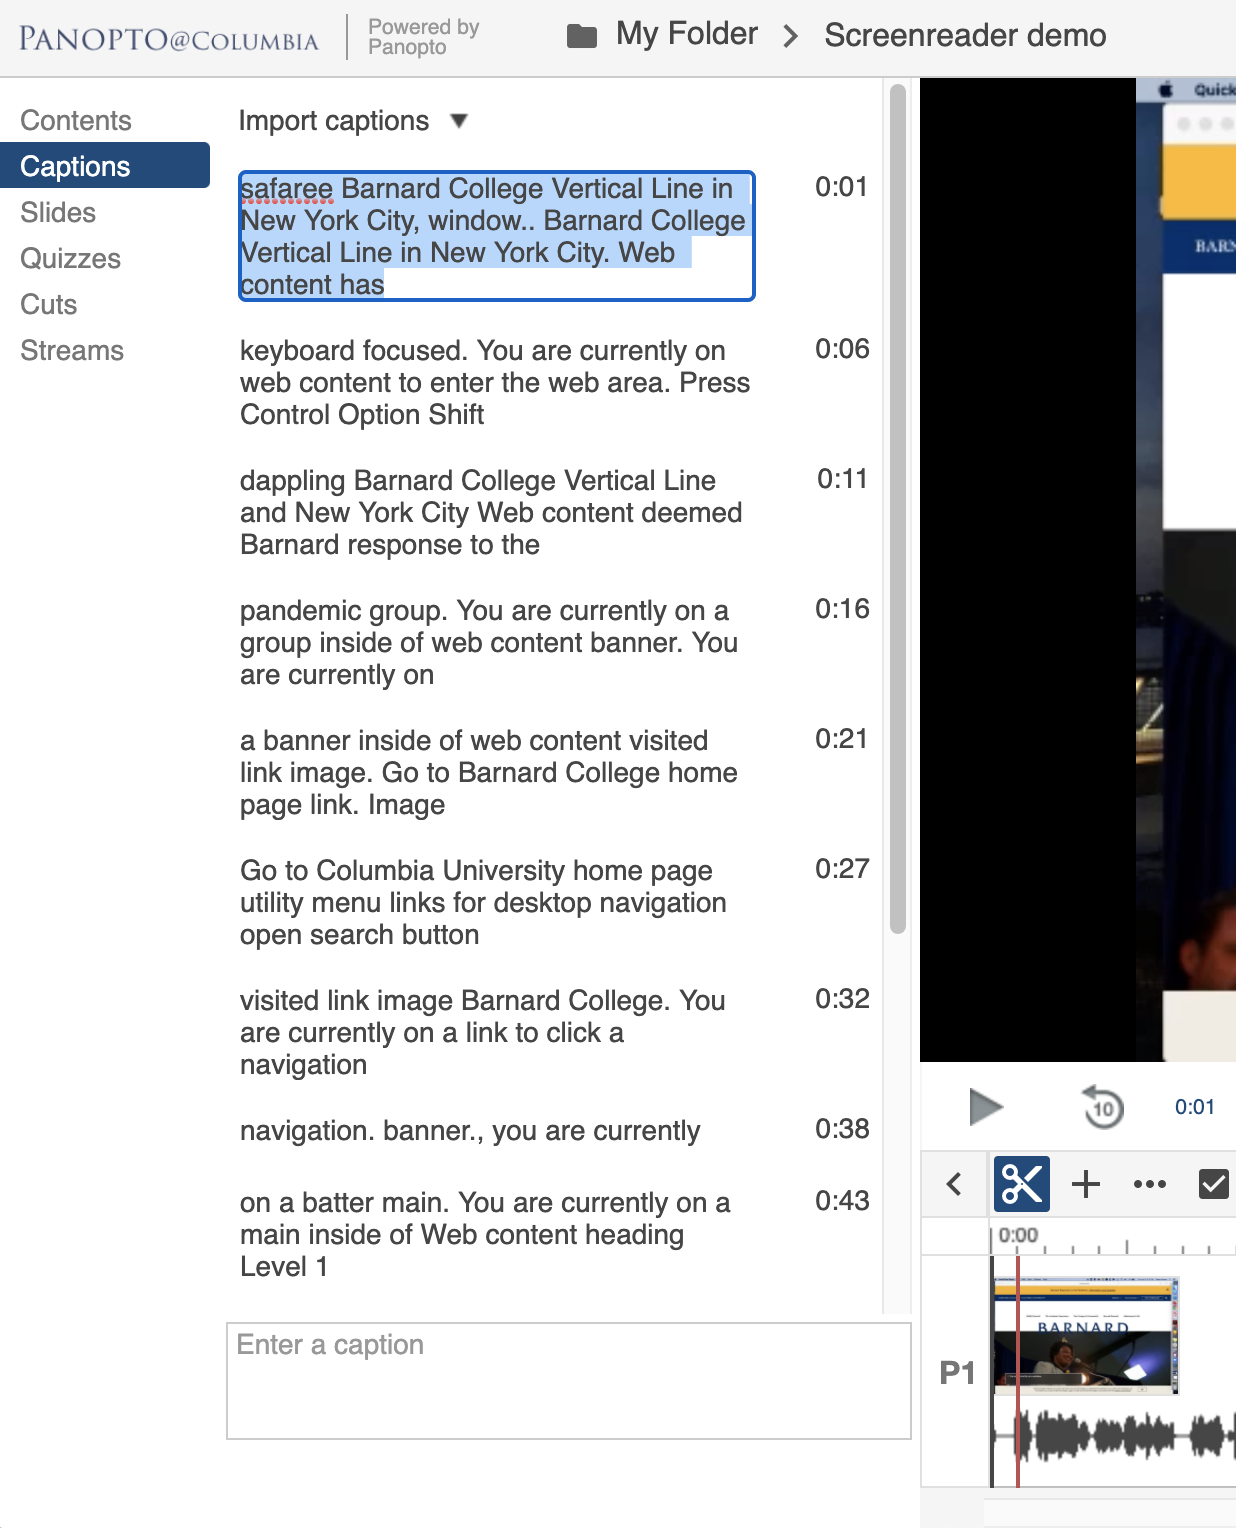
- When the auto-captions are ready, you'll want to review and edit, since there are often mistakes in auto-captioning. You can do this by clicking the edit button for the video.
- On the left-hand side menu, navigate to the captions section. You can then click into any caption to edit the text.
For more information, please see Panopto's article on adding and uploading caption to a video.
If you have a guest speaker, you can send them a Zoom invitation for you class session. To do so:
- Navigate to you Zoom Class Sessions in CourseWorks
- Click the Topic name (in blue); this will take you to the meeting details
- Scroll down to Invite Attendees; click copy the invitation
- A pop-up window will appear; click copy the invitation again
- Paste the invitation into an email and send it to your guest speaker
Additional information can be found in Zoom’s guide to inviting others to join a meeting.
Note: If your class sessions are set up as a recurring meeting, the invitation will include all that dates of the class. You can edit the invitation to your liking once you've pasted it into an email.
The Virtual Background feature allows you to display an image or video as your background during a Zoom Meeting. Make sure your computer meets the system requirements for Virtual Background.
- Sign in to the Zoom desktop client
- Click your profile picture, then click Settings
- Select Video & effects, then click Virtual background
- Check I have a green screen if you have a physical green screen set up. You can then click on your video to select the correct color for the green screen
- Click on an image to select the desired virtual background or add your own image by clicking + and choosing if you want to upload an image or a video
There is a collection of Barnard images to use as your virtual background on Zoom. Additional information about Zoom virtual backgrounds can be found on their website.